In specific scenarios, it may be beneficial to temporarily or seasonally adjust campaigns or products (= Product Ads). Examples include special (one-time) sales events such as Prime Day or simple seasonal factors such as summer or winter months. The scheduling function in BidX can assist you in automating these adjustments.
Case Study: Decrease your ACoS by 16% with Dayparting!
This article is divided into three sections
- How can a new schedule be created in BidX?
- What are the basic settings I can configure for a schedule?
- The different types of schedules
3.1 Time of Weekday
3.2 Individual Interval
3.3 Performance
1. How can a new schedule be created in BidX?
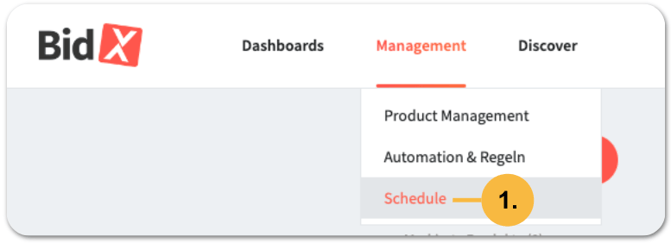
The new scheduling function can be found in the Management section:
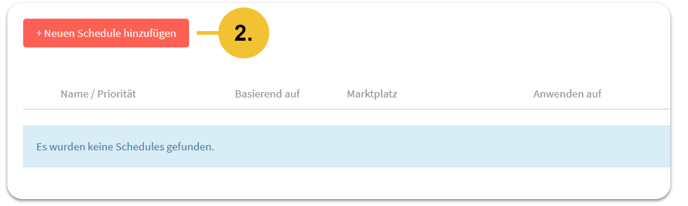
To create a new schedule, click on the + Add New Schedule button:
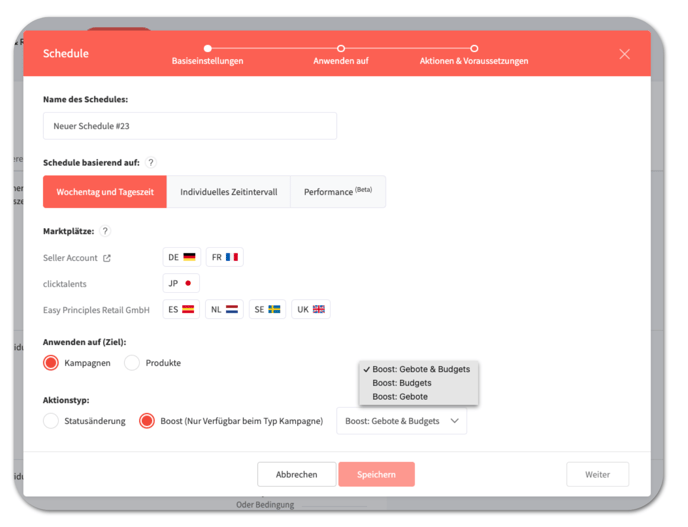
2. What are the basic settings I can configure for a schedule?
1. Target
A new schedule can be applied to two different targets:
- Campaigns
- Products
Depending on the selection, either a campaign is adjusted or the products (= Product Ads) within the ad groups are adjusted.
2. Action Type
On this basis, one of the following action types can then be specified:
- State change
- Boost (more Information on the Boost-Function here)
Products can be paused or activated (state change). For campaigns, you can also choose whether to adjust the Daily Budget or Bids, or both the Budget and Bids (boost).
Note: Every time a boost is applied to a campaign – manually or via a schedule – bid adjustments are executed. At this point please note that BidX Automation optimizes targeting based on data since the last bid adjustment.
3. Schedule Type
In the last step, a schedule type can then be selected – it defines on what the schedule should be based on:
- Time of Weekday
- Individual Interval
- Performance
Note: The time displayed always refers to the local time zone of the marketplace to which the schedule applies.
3. The different schedule types explained in detail
The actions and requirements vary depending on the schedule type selected.
1. Time of Weekday
This schedule type provides a heat map showing the relative sales figures for each of four time slots on the corresponding days of the week. Based on this data, you can now set a planned status change or a boost.
Example of a Heatmap:
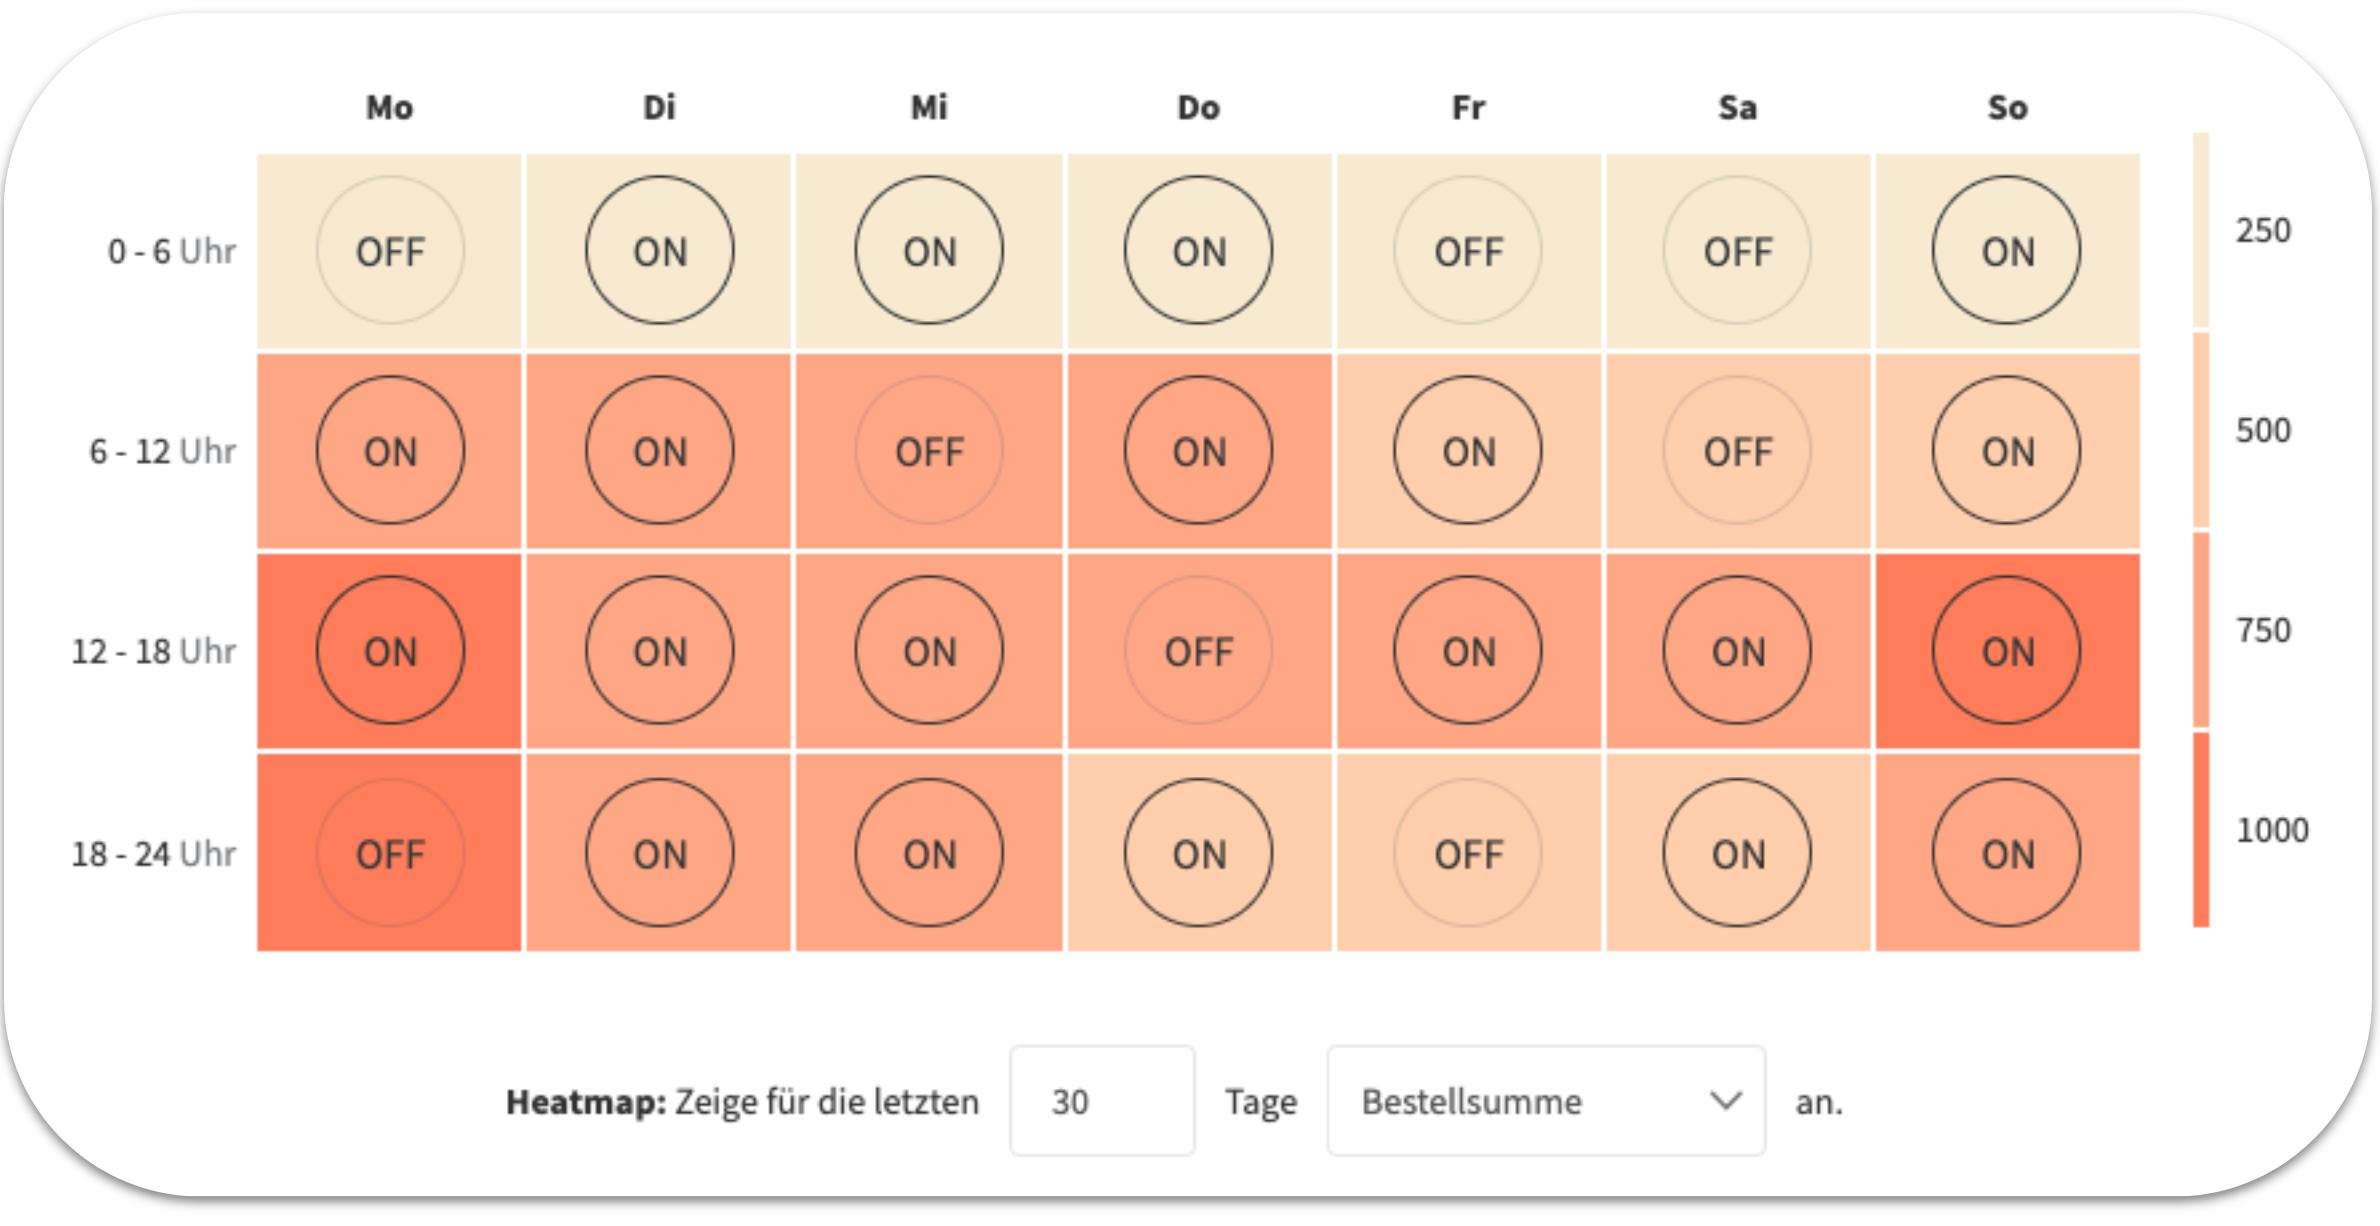
Attention: The heat map currently can only be displayed for seller accounts with a connected Selling Partner API. However, even without the heat map, a schedule can be created based on the time of weekdays.
Example: On Sundays and Mondays between 6 p.m. and midnight, Example Company Ltd. experiences relatively high sales. To further leverage this effect and thus scale sales, it is advisable to set a Boost on the budgets and bids of the campaigns.
On Saturdays between 6 a.m. and 12 p.m., as well as between 12 p.m. and 6 p.m., sales are relatively low. Therefore, applying a negative Boost is recommended in order to reduce advertising spend during these periods.
2. Individual Interval
This schedule type allows you to automate adjustments to products or campaigns based on a time interval. For example, a campaign can be boosted once or paused regularly on Fridays and Saturdays. Schedules can also be repeated monthly or annually.
Example: The bestseller of Example Company Ltd. is transitional jackets. It is well known that demand is particularly high in spring and fall. At this point, it makes sense to activate the campaigns with a schedule. In addition, another schedule can be used to reinforce the campaigns so that the products are advertised as effectively as possible at the beginning and later achieve a good position organically.
3. Performance
If you select the schedule type Performance at the beginning, you can then choose between three performance KPIs, which will be used as the basis for adjustments to the selected campaigns:
- Based on the product's bestseller rank (BSR)
- Based on the product's stock levels
- Based on the product's position in search results (Share of Voice)
3.1 Bestseller rank (BSR)
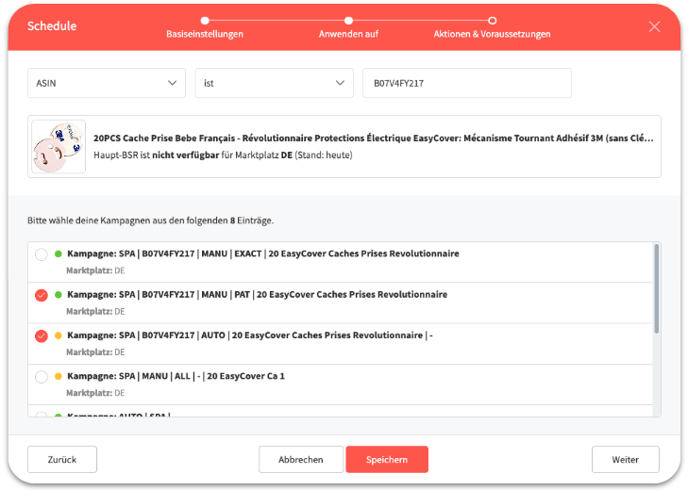
If you select the basic type Performance at the beginning and then Bestseller Rank (BSR), you can boost campaigns for a product via the product's Bestseller Rank (BSR) or change their status, depending on which action type you select. If you select this performance KPI, you can then choose whether the bestseller rank of the main category or the subcategory should be considered.
On the top of the next window, you can enter the ASIN of the product to which you want to apply the schedule. Here you can also select the campaigns.
Once you have selected the campaigns and clicked on next, you can now set the Actions & Requirements. You will now see an axis with the best bestseller rank (1) on the left and the worst (MAX) on the right.
You can now define steps. Below the axis, you can set the limits for the steps. For example, you can set two limits at bestseller ranks 200 and 5000. Then, above the axis, you can select actions for these steps. In this example one action each for bestseller rank 1 to 200, 200 to 5000, and 5000 and above. Depending on whether you previously selected State change or Boost, you can either select a boost here or the actions Pause, Keep, or Enable.
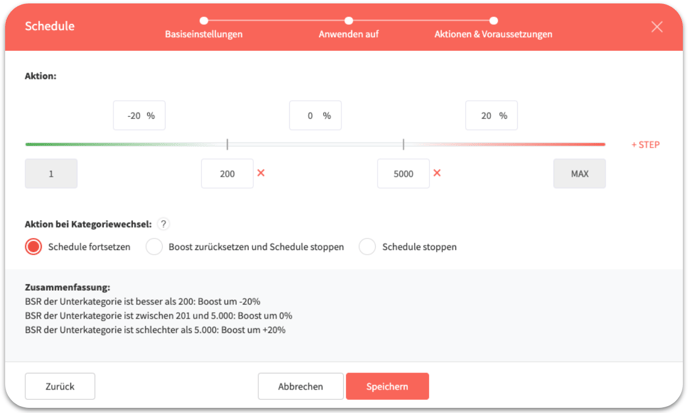
At the bottom you can find the Summary section, where you will see the actions and requirements listed again. You can add further steps using the “+STEP” button on the right. Click Save to create the schedule.
In addition, in the section Action in case of category changes, you can define what should happen when the category of the product is changed manually or by Amazon. You have the following options: continue the schedule without changes (Keep schedule), deactivate the schedule and reset all changed values to their previous default values (Set boost value to 0 and stop schedule), or stop the schedule with the currently applied values (Stop schedule).
Note: A product must have been sold at least once on the corresponding marketplace in order to receive a bestseller ranking.
3.2 Stock level
Attention: To use the schedule type Performance with the Stock level KPI, the Selling Partner API or the Ventory One API must be connected.
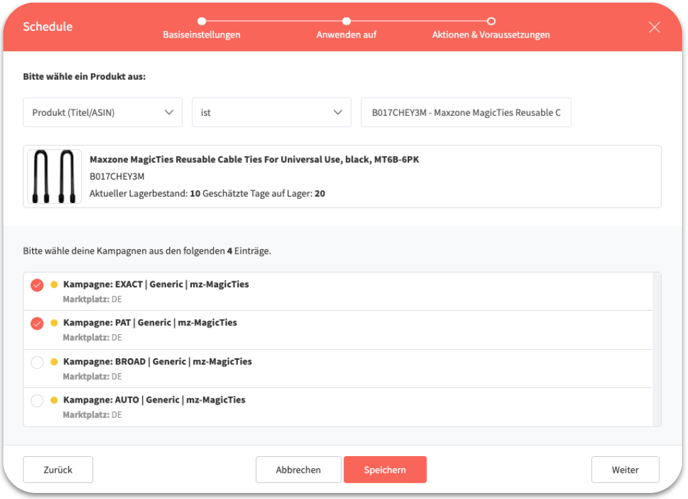
First, select the schedule type Performance and then Stock level. You can now choose between two different options. With the first option, Current stock, the schedule always considers the current stock level of the product. With the second option, Estimated days in stock, the schedule considers the calculated estimated number of days that the product will remain in stock. Depending on which action type you then choose, you can boost the product's campaigns or change their status.
At the top of the next window, you can enter the ASIN of the product to which you want to apply the schedule. After that, you can also select the campaigns.
After selecting the campaigns and clicking next, you can now set the Actions & Requirements. You will now see an axis with the lowest stock level or the lowest estimated days (0) on the left and the highest (MAX) on the right.
You can now define steps. Below the axis, you can set the limits for the steps. For example, you can set two limits for inventory or estimated days in stock at 3 and 100. Then, above the axis, you can select actions for these steps, in this example one action each for stock level/estimated days in stock 0 to 3, 3 to 100, and 100 and above. Depending on whether you previously selected State change or Boost, you can either select a boost here or the actions Pause, Keep, or Enable.
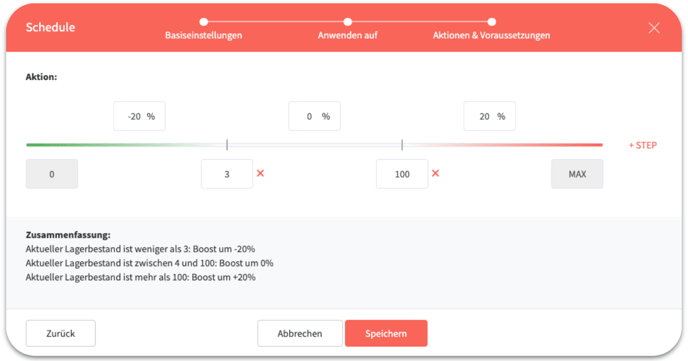
At the bottom you can find the Summary section, where you will see the actions and requirements listed again. You can add further steps using the “+STEP” button on the right. Click Save to create the schedule.
3.3 Share of Voice (SOV)
At the beginning, select the schedule type Performance and then Position in search results (Share of Voice). Now you can choose between two different options. With the first option, Organic position, the schedule considers the positioning of the product for the keywords based on all unpaid positions. With the other option, Paid position, the schedule considers the positioning of the product for the keywords based on all paid positions. After you have selected organic or paid position, you can choose the keyword list that the schedule should consider. Depending on the action type you then select, you can activate or deactivate the product's campaigns or boost the keywords in the list.
At the top of the next window, you can enter the ASIN of the product to which you want to apply the schedule. After that, you can also select the campaigns.

Next to the product, you will find the Keyword Ranks button, which allows you to track the organic and paid positions of individual keywords for this product in more detail.

Once you have selected the campaigns and clicked on next, you can now set the Actions & Requirements. You will now see an axis with the best position (1) on the left and the worst (MAX) on the right.
You can now define steps. Below the axis, you can set the limits for the steps. For example, you can set the limits at positions 5 and 50. You can then select actions for these steps above the axis, in this example one action each for positions 1 to 5, 5 to 50, and 50 and above. Depending on whether you previously selected State change or Boost, you can either select a boost here or the actions Pause, Keep, or Enable.
 At the bottom you can find the Summary section, where you will see the actions and requirements listed again. You can add further steps using the “+STEP” button on the right. Click Save to create the schedule.